During this global pandemic with the COVID-19 virus, the self-isolating and stay-at-home mandates have the nation scrambling for new hobbies and activities in the comfort of their own yards. Bird watching and feeding are not only entertaining but also highly beneficial to the bird species in your region.
Traditional wisdom suggests that birds should only be fed during the winter months, as the plants and native foods are more scarce. However, with appropriate choices, your bird feeder can supplement the naturally occurring food sources.
One of the benefits of feeding during the spring and summer months is the opportunity to watch the birds' plumage change with the seasons. For example, bright yellow male goldfinches are only seen when the weather is warm.
Hummingbirds are another species that are present in the summer. The migratory patterns of these little birds bring them to Ohio beginning in late March or early April. They have geographical memories for reliable sources of food, so once you begin feeding them, they will return year after year. For that reason, it is better to put the food out earlier rather than later in the season. This week is an ideal time in Ohio. Hummingbirds are important pollinators, whose activity should be encouraged.
Another benefit of feeding birds, specifically, woodpeckers, is to prevent damage to your home. Woodpeckers will peck on your home's siding in the search for insects. However, if there is suet or berries available for them, it will deter them from pecking your home.
Besides the practical reasons for feeding the birds, birding is the start of a lifelong hobby and activity that requires few tools. A few important tips to get started:
1. Keep your bird feeders clean. They should be washed several times during the season with hot water and a 1:10 bleach solution to keep bacteria and disease from growing in the feeder.
2. Place your feeders near a bush or tree, which will give them a safe place to retreat from predators (such as hawks).
3. Do not feed your birds bread, as it offers little nutritional value. Another don't is chocolate, as it is toxic for them. Table scraps are also a no-no and are likely to attract undesirable rodents.
Find a reliable source of birdseed and get ready for a bird buffet of feathered friends visiting your yard. Local Soil & Water Conservation Districts are a great point of contact to the agriculture and natural resource community.
Today's post is what hopes to be the beginning of regular contributions from "Mama Green" -- who has shared her wisdom in the past with us. The last time I visited her, I marveled at her indoor garden and asked her to write an article for Our Daily Green. We have included links a company that we are affiliated with, and if you use their site, we recieve a small commission. Any proceeds will go to mom.
It is “SPRINGING” with
greening grass, emerging daffodils, birds building nests and days getting
longer. There is HOPE in our hearts for a bountiful garden this season. Despite being faced with
a heretofore unknown pandemic, we CAN STILL look forward to planting. Now is
the time to begin to nurture seeds to become plants. I treated myself to a
Hydroponic Garden which placated my throbbing GREENTHUMB during January and Februart.
March is the time to begin sprouting some garden seedlings. All early brassicas,
celery, eggplant and peppers can be started in March. The second week of April
is time to start tomatoes, chard, cukes and summer squashes. Many annual
flowers can be sown also. Wait until late May to direct seed others. To begin indoor
gardening it is necessary to supply soil (NOT dirt). Seed-starting mix is a
light blend of peat and vermiculite. I add coffee grounds and ground eggshells to
my mix. Keep the soil mix damp, but not wet. I plant in paper egg carton cups
and add water to the tray from bottom. Cover with plastic to create a
greenhouse effect. To simulate Spring Sunshine, HEAT and LIGHT are needed. I
use an electric blanket covered with a plastic tablecloth to imitate warm
earth…70 degrees needed for germination. Sunlight of 8-10 hours is mimicked by
a grow light or ordinary florescent bulb. Light is needed when sprouts appear.
Begin with light a few inches and gradually move to 10-12 inches as plants
grow. Rotate as needed to avoid weakening the stems. Often in an artificial
environment, “damp-off” occurs at the soil level of the seedling. A sprinkling
of cheap cinnamon powder will solve that. All utensils and pots needed to be
sterile to avoid disease. As soon as the outside temperatures are a consistent
70 degrees, begin “hardening” off your fledglings. Place them in a wind
protected area in semi-shade for a few days and gradually expose them to
ordinary atmosphere. When you begin to
“PARENT” plants treat them as you would a child. Gentle coddling at birth,
patient training as youngsters and “tough-love” as adolescents. Nurture them
with food and water, affection, and protection. Talk to them, give them music,
and love. They will reward you with wonderful GIFTS! ISOLATION and SOCIAL
DISTANCING are NOT necessary when you deal with “green and growing” entities.
They are products of Mother Nature, one of God’s marvelous gifts to us. GET
GROWING!
byline: Carol Perzy Greenfield Gardens Litchfield, Ohio
For many years now, I've been a bread baker. My grandmother taught me how to bake bread when I was a little girl, and for our wedding present, she bought us a Kitchen-Aid with a dough hook. 30 years later, that mixer is still a workhorse in the kitchen.
In the past few weeks, as panic buying kicked in around the nation facing the COVID-19 virus, all the dry yeast disappeared from the store shelves. While I normally keep a jar of yeast on hand, I was unable to find more and saw my supply rapidly dwindling. In the past, I have made a sourdough starter and bread, but honestly, keeping the starter fed and active just wasn't one of the things I wanted to do to have bread on a regular basis.
However, times like these call for a new normal, and with very little yeast left, I knew I had to whip up a batch of starter.
Alas, most of the starter recipes called for rye flour, and I didn't have that on-hand, just all-purpose, bread, and wheat flours. I decided to experiment in small batches. Purists will shun using yeast in a starter, opting for natural fermentation, but I didn't have the right flour or the patience.
After combing the internet for information, and relying on my experience with a poolish, I decided to create my own starter using 1 teaspoon of active dry yeast, 1 cup of warm (115 degrees F) water, and 1 cup of all-purpose flour. I mixed it up in a jar with a lid, using a plastic spoon (you should not use metal with sourdough starter), and left it on the counter at room temperature for the next 48 hours, stirring periodically, whenever the liquid separated from the starter.
After 48 hours, I fed the starter with another cup of warm water and a cup of flour. I stirred well and again let it rest another 24 hours, again stirring when the water separated. The starter seemed to be coming along nicely, smelling yeasty and filled with bubbles. Again in 24 hours, I added one more cup of water and flour, and let it rest. I knew I had the base for my next loaves of bread.
Once the starter is finished, it can be refrigerated. To use it in a recipe, bring it back out for 24 hours to come to room temperature.
Many sourdough recipes are labor-intensive, but I really had already invested several days in the starter, and again, I lack patience and really wanted to find out if my experiment was going to work. Keep in mind that when you use the starter, you'll need to replace the amount you use with equal parts of water and flour and again leave it out for 24 hours to ferment.
I adapted a simple recipe from Commonsense Home by Laurie Neverman that I successfully adjusted to suit our needs. See the link for the original recipe and additional notes.
Ingredients
2 1/3 cups fresh sourdough starter
3 1/3 cup flour
3/4 – 1 cup warm water (115 degrees F)
Scant tablespoon salt
Instructions
Mix sourdough starter, flour, and salt together. Use enough water to make bread dough (a moist dough is preferable to a dry dough). The dough was very sticky when I started with 1 cup of water, so I will do less next time.
Fold the dough over itself, repeatedly until everything is well mixed. Again, the dough was so sticky that I couldn't really knead it, but I didn't want to dry it out too much, so I folded it over and over gently on a floured surface.
Shape the dough into a loaf, place on a baking sheet, and cover lightly with a towel and allow the dough to rise for 4 hours. This was when my dough flattened out dramatically, again because the dough was so wet.
After 4 hours, I punched the dough down and divided it in half to make two loaves. I knew it needed a loaf pan to hold its shape. I sprayed the pans with non-stick spray, and let the dough rise another 4 hours.
Bake at 400°F (205°C) for about 45 minutes, until the crust is nicely browned. Cool completely and slice. If you want the crust to be softer, put it into a bag to cool. Otherwise, leave out for a harder crust.
I am quite pleased with my first sourdough experiment. I'm sure there will be additional tips I pick up with more experience. Please feel free to reach out to me with any questions, I'll try to help!
Happy eating and home cooking. Stay safe and physically distant until this passes.
Monday, January 20, 2020
The Earth needs multiple methods for removing CO2 from the air to avert worst of climate change
In a 2018 consensus study, the U.S. National Academies of Sciences concluded that negative emission technologies will be needed to reduce difficult-to-reduce emissions even if most emissions from burning fossil fuels, agricultural land use and cement production – the top sources of man-made greenhouse gases – could be eliminated. The study noted that direct emission reductions in some sectors, such as air travel, will be always remain more difficult to achieve and will require methods to remove CO2 from the air and store it away.
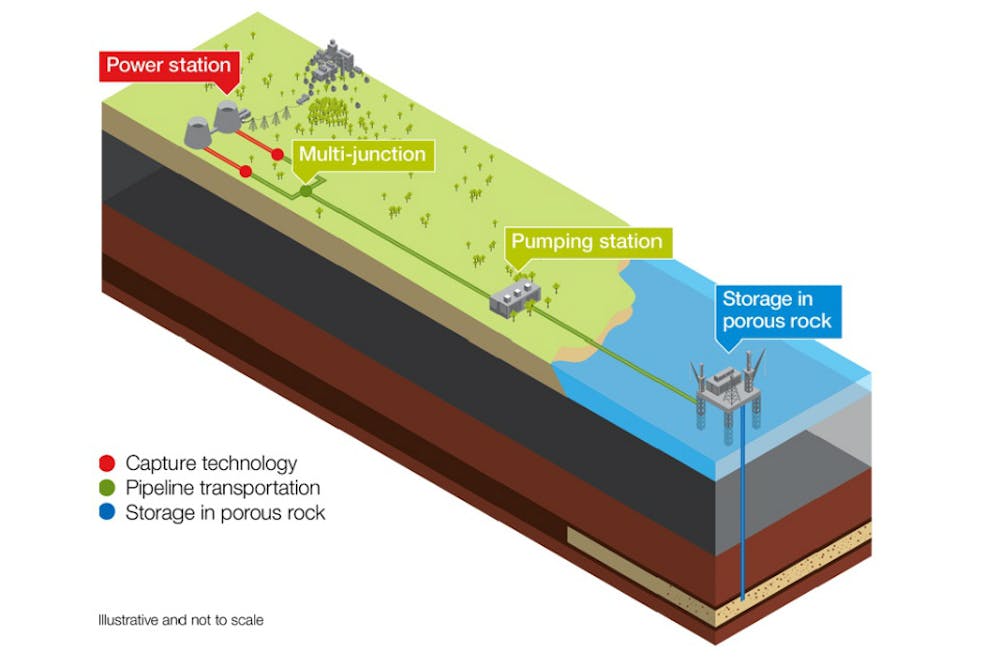
The concept of carbon capture and storage is to separate carbon dioxide from the emissions of burning fuel, such as those generated at a power plant, and to permanently store them underground.UK Department of Energy and Climate Change, CC BY-ND
The scale of the problem is daunting. In the U.S. alone, which emits about a sixth of current global CO2, and with global energy needs steadily increasing, emissions to the atmosphere are expected to outpace uptake and the volume of waste gas will only grow. In its latest emissions gap report, the United Nations warned greenhouse gases will continue to rise despite most countries committing to reduce them, calling the forecast for reversing the course “bleak.”
Where should CO2 be safely put away? The most convenient sites appear to be near industrial sources, such as power plants, but they can come with a tangle of issues surrounding underground property rights, overland access, and long-term risks and liabilities near populated areas.
A researcher explains how a prototype of how a direct air capture device works to remove CO2 from the air for underground storage. My research has suggested that offshore storage sites around the globe may offer several unique and important advantages. In particular, CO2 injected into cooled volcanic rocks
under the ocean will react chemically with them to form solid minerals like calcium carbonate – limestone – mimicking the natural process of rock weathering.
Although this technique has not been demonstrated in large-scale experiments, my research suggests that sub-sea rocks have the potential to provide vast capacity for hundreds of years of emissions, physical safeguards that will protect the oceans and humans, and can be located at safe distances from potential interference with ongoing human activities.
Portfolio approach
But that alone is not enough. Considering the various negative emission technologies reviewed by the U.S. National Academies of Sciences, it seems clear to me that all possibilities for carbon capture and storage need to be pursued in parallel. That’s because no one location, no singular technology and no country in isolation will be sufficient to solve this huge problem by itself. Different industrial, economic, legal and environmental conditions around the globe will require different solutions, and ultimately, these must all work together. In my view, pursuing a wide range of solutions does not create a competition between eliminating emissions and directly decreasing the CO2 concentration in the atmosphere.
Some researchers have voiced the concern that adoption of these technologies will discourage efforts to lower emissions. But some of these technologies, such as removing CO2 directly from the air, are currently expensive and efficiencies are still improving. So, with regulations to limit carbon emissions, polluters would face the costs of directly reducing emissions or the financial consequences of continuing to emit while relying on negative emissions technologies – both solutions would reduce CO2 waste collecting in the air.
Any concerns over costs, though, should be compared to cost of doing nothing. It is estimated that allowing emissions to continue apace may reduce GDP in some areas by as much as 1% per year, reflecting potential losses in productivity due to the effects of warming on regional resources, jobs and public health.
Both social and economic incentives will likely be needed to implement these technologies at the scale required to address climate warming, similar to past subsidies and research investments in alternative energy technologies that are now widespread.
To make negative emission technologies viable, industry needs physical and measurable proof of those which will be most effective and then the means to implement them at full scale. That means large government and private investments in research and development for these technologies.
[ Deep knowledge, daily.Sign up for The Conversation’s newsletter. ] David Goldberg, Lamont Research Professor, Columbia University
This article is republished from The Conversation under a Creative Commons license. Read the original article.
As the new year dawns, and the winter hibernation season turns to hope for the spring, we start to consider our plantings. While the recommended plantings in this article are geographically specific to Ohio, the reasoning is universal. When choosing plants for your landscaping, it is important to pick native plants that will thrive in the local environment.
Any yard of any size can grow native plants, which attract important insects and pollinators. Pollination is important for the propagation of local food and animal sources. It's part of bigger plan of eco-diversity.
Along the same vein, perhaps even more importantly, you should avoid invasive species of plants for several reasons. Invasive species crowd out other native species, upsetting the natural eco-system. An example of a popular but invasive plant is the well-known butterfly bush.
An invasive species will easily spread but as it spreads and flourishes, it will crowd out the natural species to the region and upset the delicate balance of nature.
Additionally, in the example of the butterfly bush, while it contains a great deal of attractive nectar and draws in butterflies, it is not the right host plant for the insect. Think of butterfly bushes as the "fast food" of your garden. Sure, the butterflies will come and dine, but they will not be healthy and will not be able to reproduce, thereby negating the intent of attracting pollinators.
Continuing the example, since an invasive species does not serve a proper host for the caterpillars, it also disrupts the food sources for birds like chickadees which require thousands of caterpillars to survive. A baby chickadee needs 6000 + caterpillars until it is an adult. Baby birds require the caterpillars for protein that is not provided by other food sources.
Better choices include butterfly weed, oak trees, and milkweed. Many conservation groups collect milkweed seeds to helps spread more milkweed. Those are the right sort of plants to help increase the population of natural pollinators.
Some of the appropriate native plants that an Ohio gardener may choose include:
Butterfly Weed
Black Eyed Susan
Goldenrod
Wild Geranium
White Trillium
Milkweed
All these plants will thrive and enhance your yard in a natural and sustainable manner. They will become part of the eco-system supporting pollinators, birds, and soil.
These plants are widely available at local nurseries and a much better choice for your yard than an invasive species. Ohio is in the Zone 5 planting region, meaning that the best time to plant is between frost season, from late May until early October. To learn more about appropriate plants for your region, you can contact your county soil and water conservation district.
Specific to Our Daily Green's location, contact the Mahoning County Soil and Water Conservation District for additional information and equipment rentals for larger land plots. The district also holds its annual milkweed pod collection from September 1 to October 31 each year.